Shellinabox and OTP (One Time Password)
Translation of the original in Catalan. Read it in: CatalàCastellano
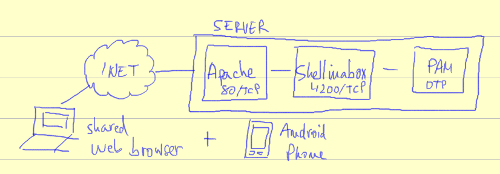
Sometimes you need to be able to access the shell of a server but you do not have any SSH client or anything similar, or there are even cases where you can only access through a proxy using HTTP, you do not even have HTTPs. For these cases what I have done is set up the following:
A shellinabox which is a daemon that publishes a shell over HTTP, so that the browser can be used as a client. Unlike other solutions this one is implemented taking advantage of AJAX and does not need support for flash, java or other similar technologies. If you have not tried it, do it because it is impressive how well it works.
Well then, thanks to the shellinabox daemon we could already publish on port 80 the login screen of our server, but in my case on port 80 I have Apache running, so then, what I have done is set up a reverse proxy taking advantage of the features of Apache, so that when I connect to a specific subdomain Apache redirects my HTTP connection to the shellinabox server.
When using this client that works over a protocol without encryption anyone could easily obtain the user and password I use to access the shell. In order to solve this problem what I have done is install OTP support as an authentication method in the PAM of the server.
That is, when the user does a login through any service that uses the PAM 'common-auth' authentication system they will be able to do it with the system password or with a one-time password. That guarantees me that after I have authenticated to the shell with a password nobody else will be able to do it with that password.
Diagram of the idea
Apache configuration, reverse proxy
First of all you have to enable the 'proxy' module of Apache:
a2enmod proxyThen we create a subdomain and forward the traffic to the shellinabox server:
<VirtualHost *:80>
    ServerName elteusubdomini.exmaple.tld

    ProxyRequests Off
    ProxyPreserveHost On
    ProxyPass / http://127.0.0.1:4200/
    ProxyPassReverse / http://127.0.0.1:4200/

    LogFormat "%h %l %u %t \"%r\" %>s %B \"%{Referer}i\" \"%{User-Agent}i\" %D" common
    CustomLog /var/log/apache2/elteusubdomini.exmaple.tld.access.log common
    ErrorLog  /var/log/apache2/elteusubdomini.exmaple.tld.error.log
    LogLevel  warn
</VirtualHost>
After that you can already restart apache, remember to create the corresponding DNS entry.
Parameters I use for shellinabox
Although the shellinabox manual is full of very interesting options in my case with the following parameters I have had enough:
/opt/shellinabox/bin/shellinaboxd --no-beep -t -b-
--no-beep I do not want it to emit 'beeps', try it without that, they gave me such a fright that I am still shaking
-
-t to disable SSL which is enabled by default
-
-b it is launched in the background
OTP configuration in the linux PAM
The OTP support I have added to PAM is very limited and basic, since I did not want to add more complexity to the system, that is, to control the users who can access via OTP I have used a simple plain text file and to validate the authentication I rely on pam_script which is a PAM module that allows launching an arbitrary script to validate the authentication.
Perhaps one of the most recommendable ways if you want to use OTP on a more professional server than the one I have used would be to do it through RADIUS, or else, using MOAS which offers a web interface made with PHP and a MySQL backend to maintain a table of users and other configuration details.
Back to the case at hand, the PAM configuration I have used is as simple as:
# fitxer: /etc/pam.d/common-auth
...
auth    sufficient      pam_script.so onerr=fail dir=/etc/pam-script.d/

auth    sufficient      pam_unix.so nullok_secure try_first_pass
...
The first line adds pam_script support for authentication, in addition to adding two parameters that indicate that if it fails the authentication will fail and it also indicates in which directory the authentication script has to be looked for. This is where it will be tested whether an OTP password has been entered.
The second line is standard in the ubuntu where I have done the configuration, except the last parameter try_first_pass which says to try again the password that has been entered in the previous step, that way we do not have to re-enter it to validate whether the password entered is a system password.
Both lines use the 'flag' sufficient, that is, if either of the two is met it will be enough to positively validate the authentication.
The pam_script is a PAM module that when installing it has created the folder /etc/pam-script.d with a few files inside it. Here the only thing we will have to do is delete the symbolic link called: /etc/pam-script.d/pam_script_auth. Since by default it points to /etc/pam-script.d/pam_script and we do not want to use the default script but our own script, that is, the one that does the OTP validation.
The script that does the validation I have modified it a little bit with respect to the default script and I have placed it in: /opt/otp/otp-auth. Now we can already redo the symbolic link that we had deleted before:
ln -s /etc/pam-script.d/pam_script_auth /opt/otp/otp-authIn the /opt/otp/ directory we also need to have:
-
otp-auth - script that does the validation, made with Perl and with some dependency
-
otp-secrets - configuration file of the users who can use OTP
-
cache/ - directory needed to store keys temporarily
The configuration file of /opt/otp/otp-auth, /opt/otp/otp-secrets, looks like this:
%users =
(
        username =>
        {
                secret => 'codi_secret_compartit_amb_eina_client',
                pin => ping_acces_eina_client,
                offset => 0,
        },
        anotheruser =>
        {
                secret => 'ZZZZZZZZZZZZZZZZ',
                pin =>  IIII,
                offset => 0,
        },
);
1;
In my case, the secret I have generated it with the client tool that I have installed on my mobile (Android). The pin you can simply make it up and it is necessary to enter it in the client that generates the keys.
OTP client for Android
The client I have used for Android is Mobile-OTP, when you run it for the first time it will guide you so that you generate a secret and a pin, when you have them you have to put them in the configuration file /opt/otp/otp-secrets.
Process of use
We go to any browser connected to the internet, we access the subdomain we have defined and a login screen appears, we enter the user and it asks us for the password.
Now we take the mobile and open the Mobile-OTP application, we enter the PIN code and press the 'Calculate OTP' button, immediately afterwards a code with numbers and letters and a length of 6 characters appears, we enter this code as the password of our account and we are in.
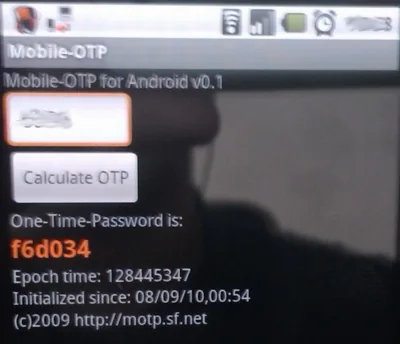
Remember that this code is valid for about 2 minutes approximately, afterwards you will have to generate it again. This code also stops being valid at the moment you have already used it once, that is, if you want to do two logins in a row you will have to generate two codes.
OTP can also be used with other services
Remember that when configuring the OTP authentication system in PAM I have done it in the 'common-auth' file, that means that any service of the machine that uses this authentication file (most of them do: SSH, POP3, IMAP, etc) will support the OTP authentication system.
So then, if you do an old-fashioned SSH to your machine but you do not want anyone to know your password just by watching how your fingers type you can take advantage of this system.
References
-
pam_script, home page
-
modified OTP script, link to the script
-
package with the original OTP script, link to the package (local)
-
MOTP-AS, Mobile-OTP Authentication Server. RADIUS and PAM support, SQL backend and PHP Web interface.
-
Mobile One Time Passwords, strong, two-factor authentication with mobile phones
2 comments
Comments from the old blog, as they were written. Comments are closed.
frommlemak
Otra alternativa sin llamadas a scripts desde pam:
opie-server + libpam-opie
No le he tenido la oportunidad de testearlo por lo que no puedo aportar mucho más. No obstante tiene buena pinta.
Oriol Rius
El coneixo però no l'he provat, ja em donaràs feedback si el proves.