OpenVPN roadwarrior (server and linux client)
Translation of the original in Catalan. Read it in: CatalàCastellano
Part 1 of 3OpenVPN roadwarrior
- OpenVPN roadwarrior (server and linux client)
- OpenVPN roadwarrior (windows client)
- OpenVPN roadwarrior over PROXY
Well I have been an OpenVPN user for a long time, for me one of the best pieces of software for setting up VPNs and it seems I am not the only one, since on newsforge you can also read an article that defends the same: SSL VPNs and OpenVPN: A lot of lies and a shred of truth. Well then setting up a LAN2LAN link you can do it in very few seconds, I would say in less than 1min. It also allows setting them up over tcp, as well as over udp, besides going over HTTP proxies I will talk about that in another article.
What I want to explain here is how I have configured OpenVPN to be able to connect from anywhere to the home network (and other networks that are not relevant now). The authentication and encryption of the link I will do with SSL/TLS. So almost everything I explained about CAs in the article: HTTPs, SSL and Certificates on Server and Client - Private webs with a C.A. we will be able to apply here.
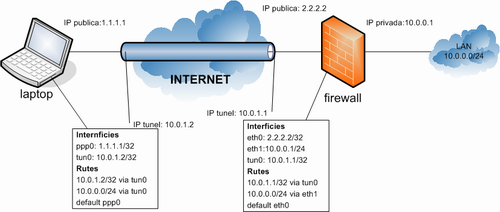
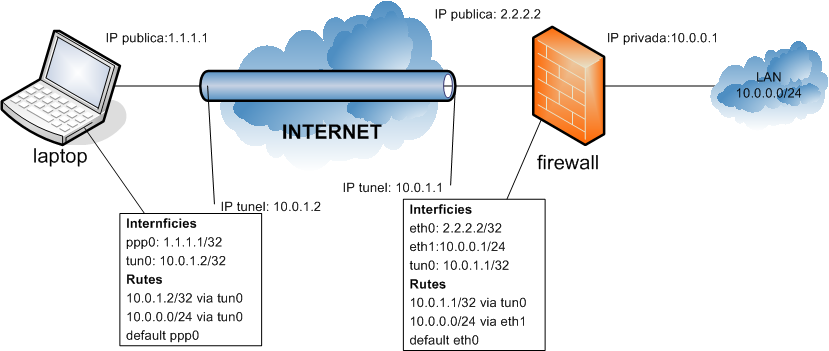
The diagram of what we are going to set up you can see in the following graphic:
|
Certificates
So, let us summarise the matter of the certificates, since we have a server and a client, we have to generate the certificate for the server and for the client, there is no need to generate the CA, because we already have one from the commented article. So we place ourselves in the ~/CA directory and create the 3 files as indicated in the article we are referring to.
Now we will have the 3 essential files:
newreq.pem -> petició de certificat que fem al CA
newcert.pem -> el certificat que ens torna el CA, després de signar la nostre petició de certificat
newkey.pem -> la clau privada del nostre certificat
Just to add a comment: while we create the commented files it asks us for the 'Common Name' you can put some representative name now we are not tied to a domain name like in the article on which we base ourselves to create the certificates. In order to organise ourselves what we will do is rename these files with the following names:
newcert.pem -> vpn-server-cert.pem
newkey.pem -> vpn-server-key.pem
The certificate request we can delete if we want. We are not going to use it. To complete the files we need to set up the server we only have to create the Diffie-Hellman parameters file. Essentially it will help us establish secure VPNs on insecure channels while exchanging the symmetric keys that will be used to make the VPN. Remember that the asymmetric keys (certificates we use) are only used as a means to establish a secure channel through which to exchange a symmetric key much faster to encrypt/decrypt for the endpoints that will allow us to maintain a secure and as fast as possible channel.
Well then let us create this Diffie-Hellman parameters file: (dh1024.pem)
openssl dhparam -out dh1024.pem 1024I have only made it of 1024bits but you can make it as secure as you want 2048, 4096 or as far as you feel like going. I have preferred not to load the systems with uselessly long keys for the kind of security I need. Well then, now we only have to create the client certificates just as we have created the server ones and as always I recommend you change the names of the new certificate, I will make the following name changes:
newcert.pem -> vpn-client-cert.pem
newkey.pem -> vpn-client-key.pem
NOTE: If you want to have more than one client connecting simultaneously to the VPN you have to create one certificate per client.
OpenVPN server configuration file
Now that we have the certificates ready I copy them to the server in the /etc/openvpn/roadwarrior/certs directory. Let us see what we have to do to prepare the configuration file, which in Gentoo goes to /etc/openvpn/roadwarrior, I call the file local.conf:
verb 5
status /var/log/openvpn-status.log
user nobody
group nogroup
persist-key
persist-tun
local 2.2.2.2
port 443
proto tcp-server
dev tun
comp-lzo
ca   /etc/openvpn/roadwarrior/certs/cacert.pem
cert /etc/openvpn/roadwarrior/certs/vpn-server-cert.pem
key  /etc/openvpn/roadwarrior/certs/vpn-server-key.pem
dh   /etc/openvpn/roadwarrior/certs/dh1024.pem
server 10.0.1.0 255.255.255.252
keepalive 10 120
push "route 10.0.0.0 255.255.255.0"
If we go in order, at the beginning the only thing we do is tell it the debug level we want it to keep and in which file. Then we define that the openvpn process we will have running on the system has no privileges on linux (nobody:nogroup). The part where we start to have interesting information is where it tells us with the local command which is the IP of the firewall that is listening for requests and tells us that it does so on port 443 and over TCP protocol. It may seem a bit strange that it listens on a port meant to be used by HTTPs but I have my reasons, anyway if you do not like the port you change it. In another article where I will talk about how to set up VPNs over HTTP proxies I will explain the reason for port 443. Then we tell it with which tunnel interface we will work and that we will use compression for the data that passes through it.
We reach the certificates part where as you see we use all the files we created previously and the cacert.perm which is the certificate of the 'root CA' that we created in the article I refer to all the time. In the last three lines the most notable thing is that we tell it from which range the IPs of the tunnel interface have to be, this we do with the server command and then with the push command we launch a static route that will tell the client how to reach the LAN we have connected inside the firewall.
If I now launch the OpenVPN daemon (/etc/init.d/openvpn start) I can see how port 443 of the public interface is listening for the connections that arrive this you can check with a netstat -lpn.
Client configuration
First of all to comment that the configuration file will be saved in /etc/openvpn/casa/ with the name local.conf and the client certificates we copy them to /etc/openvpn/casa/certs/, let us take a look at the configuration file:
client
verb 5
remote 2.2.2.2 443
dev tun
comp-lzo
nobind
proto tcp-client
ca /etc/openvpn/casa/certs/cacert.pem
cert /etc/openvpn/casa/certs/vpn-client-cert.pem
key  /etc/openvpn/casa/certs/vpn-client-key.pem
As you can check the client configuration is minimal, the most important part is the one where with the remote command we indicate which is the public IP and the port where the service that offers us the VPN is. Notice the nobind command where we tell it that the client must not be listening on any port, only open a connection against the server. We indicate which are the files to use for the client certificate and the 'root CA' certificate and ready, we already have the client set up.
To launch the client, you can just like on the server launch the command /etc/init.d/openvpn start.
TCP vs UDP
As you can see I have set up the VPN over TCP but it can also be set up over UDP, it is as simple as changing the proto tcp-server command of the server and proto tcp-client of the client, for the proto udp command. To get through some firewalls and to set up VPNs behind NATs without redirecting ports it is very useful to be able to set it up in NAT, I will explain later how all this can be done with another article.
As I have already commented before if you do not like port 443, it can also be changed for whatever you want, I do not know if at IANA level it is recommended to use a specific port for this type of VPNs.
Debugging
To see what the messages the server outputs are you can do it in the file that the configuration file itself indicates, that is, /var/log/openvpn-status.log. To see the client messages you can look at your system's general log's file often: /etc/log/messages.
If something does not work for you I recommend that you go over all the commented steps and that you look at the links of the pages on which I have based myself to make my configuration.
The test
As is logical the acid test is in from the client doing a ping to a private IP of the intranet behind the firewall, for example, if 10.0.0.1 is a server of the 10.0.0.0/24 network then from the laptop doing ping 10.0.0.1 this should answer us and if we do a traceroute -n 10.0.0.1 there should only be two hops, the firewall and the destination server. Because all the communication goes inside the tunnel and the hops that are made over the internet are transparent from inside the tunnel.
Links
Webs from where I have taken the information to set up all this:
3 comments
Comments from the old blog, as they were written. Comments are closed.
—
Als forums de gentoo hi ha un article que explica com configurar l'OpenVPN amb una interficie TAP i no una TUN que és la que jo he usat a l'exemple de dalt:
OpenVPN 2.0 TAP mini-HOWTO (linux 2 wifi-linux, wifi-xp)
Podeu trobar més informació sobre les diferències entre TUN i TAP a la documentació de l'aplicació, però escencialment TUN ens ofereix una interficie de connectivitat enrutada entre el client i el servidor i TAP ens ofereix una connectivitat via bridging, o sigui, amb menys salts. Potser la única avantatge real que hi veig és la de la transaparència i l'estalvi d'IPs dubto que a nivell de velocitat és noti. També es simplifica una mica més el tractament dels usuaris ja que tenim menys IPs a la topologia del sistema.
josep
Es pot fer això entre dues LAN, amb certificats?
—
[2]
hi tan cap problema.