HTTPs, SSL and Certificates on Server and Client - Private webs with a C.A.
Translation of the original in Catalan. Read it in: CatalàCastellano
As you can see this post has a couple of titles and I suppose it would be very easy to have many more. So I will try to describe the idea of what I will explain afterwards. What I intend to do, speaking without technicalities, is to have a web server that is only accessible in an irrefutable and secure way by the clients (browsers) that we allow. This is useful for example for banks, institutions, etc. although in my case it is simply to provide services via web that only controlled people have access to.

In order to set this up what we have to do first of all is to set up a certification entity, which we will call CA (Certifcate Authority). This will allow us to issue as many certificates as we want both for servers and for clients. In fact, for this to be publicly recognised we would only need the certificates to be signed by an SA (Signing Authority) or trusted authority. So that you know what I am talking about, some examples of authorities of this type are: Baltimore, RSA, VeriSign and Thawte. In fact, if we want to we ourselves can act as an SA, what we will not have is the trust of third parties, since they will not recognise us as a TA (Trust Authority). But for our example we do not need it so we will do everything ourselves.
In fact, this whole story of certification entities is much more complex, but we will only go as far as we are interested in. Trying to simplify as much as possible. We also do not need to set up a professional PKI (Public key infrastructure) to work with something so simple. So, we already have it clear that we have to set up a CA (root CA) that will issue issue certificates signed by itself (self-signed certificate). These certificates may be used by servers and clients. So, if we set up a server that uses this certificate we can make it require that clients have a certificate in client mode otherwise they will not be able to access the offered service.
For the case we are interested in what we will do is set up a web server, Apache specifically, which can only be accessed by clients (firefox, netscape, MSIE, etc) that have the corresponding certificate.
What do we need to set up the CA?
You only need to have OpenSSL installed, as always I use Gentoo and the package I have used is dev-libs/openssl-0.9.7e-r1. The most important configuration file of this package is at /etc/ssl/openssl.cnf. I have modified it specifically where it says default_days = 365 I have changed the 365 to 3650 so my certificates instead of being valid for one year will be valid for 10 years. If you want this can also be changed through the command line when launching the CA.pl script with the -days parameter.
As I already commented in the article: Xarxa Wifi Segura: freeRadius + WRT54G = 802.1x (WPA-radius EAP/TLS), where a certification entity also had to be set up, the gentoo distribution does not install the CA.pl file by default and it may be that you do not find it on your system after installing openSSL. So, what I have done is to uncompress the openssl package and bring the file directly from there and then I have copied it to a directory where I will work from now on: ~/CA.
We create the root C.A. (root CA)
Once inside ~/CA to generate the certificate of the root entity (root CA) you only have to do: perl CA.pl -newca.
$ perl CA.pl -newca
CA certificate filename (or enter to create)
Making CA certificate ...
Generating a 1024 bit RSA private key
......................++++++
.............++++++
writing new private key to './demoCA/private/cakey.pem'
Enter PEM pass phrase:
Verifying - Enter PEM pass phrase:
-----
You are about to be asked to enter information that will be incorporated
into your certificate request.
What you are about to enter is what is called a Distinguished Name or a DN.
There are quite a few fields but you can leave some blank
For some fields there will be a default value,
If you enter '.', the field will be left blank.
-----
Country Name (2 letter code) [AU]:ES
State or Province Name (full name) [Some-State]:BCN
Locality Name (eg, city) []:BCN
Organization Name (eg, company) [Internet Widgits Pty Ltd]:example CA authority
Organizational Unit Name (eg, section) []:example
Common Name (eg, YOUR name) []:example CA
Email Address []:example@example.com
You will see that a directory is created called demoCA and inside it is the cacert.pem file which is the certificate of our root CA.
We issue a certificate with our root CA
First what we do is a certificate request: perl CA.pl -newreq.
$ perl CA.pl -newreq
Generating a 1024 bit RSA private key
...................++++++
.................................................++++++
writing new private key to 'newreq.pem'
Enter PEM pass phrase:
Verifying - Enter PEM pass phrase:
-----
You are about to be asked to enter information that will be incorporated
into your certificate request.
What you are about to enter is what is called a Distinguished Name or a DN.
There are quite a few fields but you can leave some blank
For some fields there will be a default value,
If you enter '.', the field will be left blank.
-----
Country Name (2 letter code) [AU]:ES
State or Province Name (full name) [Some-State]:BCN
Locality Name (eg, city) []:BCN
Organization Name (eg, company) [Internet Widgits Pty Ltd]:example company
Organizational Unit Name (eg, section) []:example e-comerce department
Common Name (eg, YOUR name) []:www.example.com
Email Address []:example@example.com
Please enter the following 'extra' attributes
to be sent with your certificate request
A challenge password []:
An optional company name []:
Request (and private key) is in newreq.pem
We obtain the file: newreq.pem. Notice that this certificate is for the server www.exemple.com. If you want to issue a certificate for any subdomain of the exmemple.com domain, you can put the following in 'Common Name' *.exemple.com. What I have not tried is putting * to see if it works for any domain that way. Although I would say it should not work, otherwise the certificate would not guarantee that the server is who it says it is.
We sign the issued certificate
This step is the one we should ask the trusted entity (TA) for, which after sending it our certificate would return it to us signed (SA). But since we are like 'joan palom' (I cook it myself I eat it myself) we will do it ourselves with the command perl CA.pl -sign:
$ perl CA.pl -sign
Using configuration from /etc/ssl/openssl.cnf
Enter pass phrase for ./demoCA/private/cakey.pem:
Check that the request matches the signature
Signature ok
Certificate Details:
        Serial Number:
            82:9d:18:98:a7:25:24:7e
        Validity
            Not Before: Oct  1 10:50:03 2005 GMT
            Not After : Oct  1 10:50:03 2006 GMT
        Subject:
            countryName               = ES
            stateOrProvinceName       = BCN
            localityName              = BCN
            organizationName          = example company
            organizationalUnitName    = example e-comerce department
            commonName                = www.example.com
            emailAddress              = example@example.com
        X509v3 extensions:
            X509v3 Basic Constraints:
                CA:FALSE
            Netscape Comment:
                OpenSSL Generated Certificate
            X509v3 Subject Key Identifier:
                EE:8C:BC:6F:3D:3B:4D:82:56:24:BB:76:E8:39:F3:23:F3:BD:C9:BF
            X509v3 Authority Key Identifier:
                keyid:EE:71:7F:C0:71:39:F1:8A:70:B4:BC:BB:F0:48:B2:77:58:E4:F6:AE
                DirName:/C=ES/ST=BCN/L=BCN/O=example/OU=example/CN=example/emailAddress=example@example.com
                serial:82:9D:18:98:A7:25:24:7D
Certificate is to be certified until Oct  1 10:50:03 2006 GMT (365 days)
Sign the certificate? [y/n]:y
1 out of 1 certificate requests certified, commit? [y/n]y
Write out database with 1 new entries
Data Base Updated
Signed certificate is in newcert.pem
Now we already have the newreq.pem signed inside the newkey.pem file. Next what we will do is extract the private key that is inside the newkey.pem file:
$ openssl rsa < newreq.pem > newkey.pem
Enter pass phrase:
writing RSA key
In newkey.pem is the private key of the 'request'.
We rename the files to make things clear
In order to simplify all the concepts a bit it is a good idea to rename the files we have generated:
newcert.pem -> server_cert.pem: certificat signat pel nostre servidor. Això ens permetrà després crear la clau del client.
newkey.pem -> server_key.pem: clau privada (xifrada) en format de texte pla necessaria pel certificat del servidor. La clau privada és la part secreta del certificat, hem d'evitar que tercers la puguin aconseguir.
newreq.pem -> server_req.pem: clau privada xifrada i la petició de certificat original.
We create the certificate for the client in pkcs12 format
It turns out that our browsers want client certificates in a format called pkcs12 (Personal Information Exchange Syntax Standard) so here we go:
# openssl pkcs12 -export -in server_cert.pem -inkey server_key.pem -out iestuff.p12
Enter Export Password:
Verifying - Enter Export Password:
Here I could also have changed the name of the file where the key is saved and not called it iestuff.p12 like the examples I have based myself on, but laziness is what it is. Well then, we already have our pkcs12 file: iestuff.p12.
We install the certificate in apache
You will not believe it but I have spent more time doing this than in all the rest and look how simple it is, but I took the opportunity to update the server and it turns out that the new apache package for gentoo works differently from the previous one and I could not find anything at all. From now on I will talk then about how to do this in net-www/apache-2.0.54-r31. But I will give a note to save time for those of you who do not use gentoo.
The note is that the only thing to do is to put the necessary details for your apache server to work with SSL and of the apache configuration files you only have to modify the 'VirtualHost' that will need the certificate. So from now on what is due is to see the skill of each one with the infinite orders that apache has for its configuration file.
IMPORTANT NOTE FOR EVERYONE: do not forget that when we work with a VirtualHost inside its own configuration space you have to use the ServerName parameter; well then what you put here must match 100% with what is in the 'Common Name' of the certificate you have issued. In addition, your DNS must resolve the mnemonic you have used with the server IP otherwise it will not work, in addition the name must be a type A record and not a CNAME within the DNS configuration.
Well then in the gentoo package I was commenting on what I have done is to modify the configuration file of the default SSL host, this is done in the file: /etc/apache2/modules.d/41_mod_ssl.default-vhost.conf. To launch apache with the default SSL host you have to touch /etc/conf.d/apache2 so that it launches with the options: -D SSL y -D SSL_DEFAULT_VHOST. With this the configuration file 41_mod_ssl.default-vhost.conf becomes valid. This file I have modified very little only so that it points to where I have copied the certificates.
File 41_mod_ssl.default-vhost.conf:
<IfDefine SSL>
  <IfDefine SSL_DEFAULT_VHOST>
<IfModule mod_ssl.c>
<VirtualHost *:443>
DocumentRoot "/var/www/localhost/htdocs"
ServerName www.exemple.com
ServerAdmin root@localhost
ErrorLog logs/ssl_error_log
<IfModule mod_log_config.c>
        TransferLog logs/ssl_access_log
</IfModule>41_mod_ssl.default-vhost.conf
SSLEngine on
SSLCipherSuite ALL:!ADH:!EXPORT56:RC4+RSA:+HIGH:+MEDIUM:+LOW:+SSLv2:+EXP:+eNULL
SSLCertificateFile /etc/apache2/ssl/server_cert.pem
SSLCertificateKeyFile /etc/apache2/ssl/server_key.pem
SSLCACertificatePath /etc/apache2/ssl/
SSLCACertificateFile /etc/apache2/ssl/cacert.pem
SSLVerifyClient require
SSLVerifyDepth  2
	<Files ~ "\.(cgi|shtml|phtml|php?)$">
    SSLOptions +StdEnvVars
</Files>
	<Directory "/var/www/localhost/cgi-bin">
    SSLOptions +StdEnvVars
</Directory>
	<IfModule mod_setenvif.c>
    SetEnvIf User-Agent ".*MSIE.*" nokeepalive ssl-unclean-shutdown \
    downgrade-1.0 force-response-1.0
</IfModule>
	<IfModule mod_log_config.c>
CustomLog logs/ssl_request_log \
          "%t %h %{SSL_PROTOCOL}x %{SSL_CIPHER}x \"%r\" %b"
</IfModule>
	<IfModule mod_rewrite.c>
RewriteEngine On
RewriteOptions inherit
</IfModule>
	</VirtualHost>
	</IfModule>
	</IfDefine>
</IfDefine>
I have removed the comments that the file carries so that it does not become so long. But the most important part I comment on below:
ServerName www.exemple.com
SSLCertificateFile /etc/apache2/ssl/server_cert.pem
SSLCertificateKeyFile /etc/apache2/ssl/server_key.pem
SSLCACertificatePath /etc/apache2/ssl/
SSLCACertificateFile /etc/apache2/ssl/cacert.pem
SSLVerifyClient require
SSLVerifyDepth  2
The first line is the note I put to you before about the ServerName, that is, putting it the same as the 'Common Name' of the certificate. The signed certificate of the server SSLCertificateFile, the private key of the certificate SSLCertificateKeyFile the directory where we keep the root certification entities (root CA) SSLCACertificatePath /etc/apache2/ssl/ and the file that contains the certificate of our root certification entity SSLCACertificateFile.
The last two lines are the most interesting: SSLVerifyClient we indicate whether or not the client needs to have a certificate. In this case we require the client to have a certificate to work. Finally in the last line we indicate what tolerance we give to the certificates we accept. That is, up to what depth we trust the entities that may have issued this certificate. Let us say it is a technicality of inheritance between trusted entities I have put a 2 but you can put any number >1 and it will work without problems.
Client configuration
Here I only tell you how it is done with firefox, but with MSIE and Netscape it is done almost the same, I am sure you will manage. I have not only added the client certificate which would be the normal thing but also the certificate of the root entity (root CA) so the browser does not ask me every time whether it should trust the certificate it receives from a root CA it does not know.
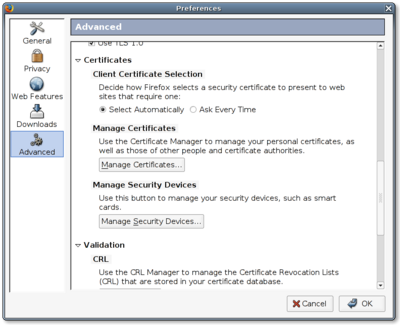
Let's go to the menu Edit -> Preferences -> Advanced -> Manage Cerficates:
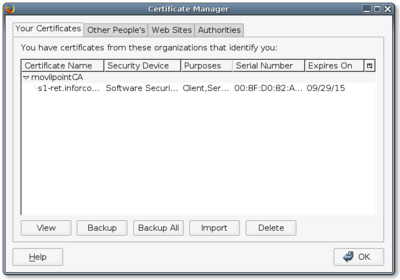
Now we install the client certificate, we go to 'Your Cerficates' and press 'Import' we select the file and import our certificate iestuff.p12:
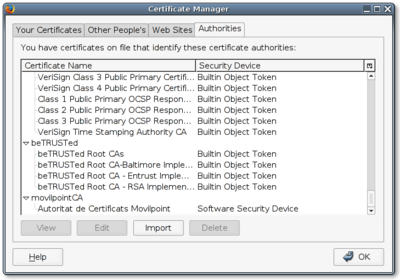
To install the 'root CA' certificate we go to the 'Authorithies' tab press 'Import' and import the cacert.pem file:
Conclusions
The whole process seems very long, but it really is not, it is just that when explaining you always go on longer than what you really have to do afterwards, besides I have tried to be quite faithful in everything I have done in each step. It could have been simplified much more. Do not worry about the server part, think that if you get stuck your problem is that you know little about apache and of that there are people everywhere who know and of manuals you have enough to get bored. As for the client part as you can see it is very simple and if the rest is fine it will work first time.
Links
To set all this up I have basically used two sites that have helped me a great deal:
12 comments
Comments from the old blog, as they were written. Comments are closed.
brainstorm
L'article esta molt complet e interessant, però treballar amb certificats auto-signats avui en dia no em dona massa confiança ;-)
—
Molt bona la referència que passes nano, però jo trobo que per aplicacions domèstiques esta més que bé la solució. Ja que trobo una tonteria pagar calers a 3eres entintats per jugar una estona i perquè no, evitar que la gent accedeixi a zones privades dels nostres sites.
brainstorm
[2] Amb cacert.org no pagues un duro... BTW, no has rebut el trackback del meu blog ?
—
[3] Ostia doncs no rebo trackbacks perquè tenia una d'spam que feia por tio... he hagut de desactivar-ho perquè sinó no et podies trobar amb un pots amb més de 100trackbaks porno... una merda. Avui fins hi tot he hagut de desactivar els 'referrers' perquè tenia una d'spam a través d'això que feia por. Això de ser blogger no és fàcil i més si portes més de 5 anys online tothom et té al punt de mira.
Gràcies per lo del cacert.org no en tenia ni idea... GENIAL!!!
brainstorm
[4] Me'n alegro que t'hagi servit, viam si t'animes i et fas assurer de CAcert :-) Jo en sóc un dels 2 que hi ha en tot catalunya (sip, encara som molt poquets :-/)... Si tens algun dubte que no estigui ja resolt a wiki.cacert.org no dubtis en preguntar-me ;-)
javiVF
Felicitats pel article! Em funciona perfectament :)
Nomes una coseta, a vore si ho he entes be, si el certificat mel firma els de cacert.org a part de ser mes "legal" m'estalvio la instalacio del cacert.pem al client?
brainstorm
[6] Nops, t'has d'instal·lar el rootCA de cacert al(s) client(s).
—
[7] tot i que des de cacert s'esta treballant perquè això no sigui així i els navegadors portin de serie el certificat, obviament el més usat el p___ IE és el que dubto que l'arribi a tenir mai. Però en mozilla ja s'hi esta treballant de fa temps pq l'inclogui. Si vols més informació de qui l'inclou i qui l'inclourà: Inclusion Status.
Gràcies de nou per la teva troballa brainstorm espero que ben aviat em pugui llegir tots els passos per apareixer en la llista de registrats pel cacert.org. És més he vist el teu blog i també m'ha interessat molt lo del NTP pool, a veure si demà que seré a l'oficina puc mirar-me els dos temes.
Avui pels que m'heu buscat he fet una altre escapada d'anar i tornar en un dia a Andorra just acabo d'arribar i ja veieu on sóc ;)
pepe
k tal tio
—
Es curiós veure com s'arriben a duplicar esforços a la xarxa, acabo de veure a la web de bulma que han publicat un article on expliquen exactament el mateix que jo explico en aquest article, de fet, no he llegit sencer el seu però jo diria que expliquen el mateix. Per si hi pot haver algo més ben explicat del que jo ho he fet millor guardem el link:
Certificados Digitales con OpenSSL II
jK
Quan executo:
rsa newkey.pem
em dona error
Oriol Rius
pots passar-me el log de l'error, potser el cert ha caducat ho has mirat...