Vodafone VRA (GPRS/UMTS) with Linux
Translation of the original in Catalan. Read it in: CatalàCastellano
As you have been able to read in the last posts I am testing Vodafone's 3G card. In order to start a development for a work matter. So then, after checking how it works with windows both with vodafone's communications software (VMC) and through the win acceso telefonico a redes. I have decided to take a look at it with Linux. The truth is that, surprisingly, the whole thing has been much simpler than I thought. I have even found much more documentation than I found more than 1 year ago when I tried the card, which back then was only GPRS.
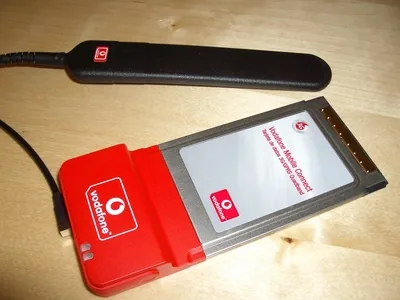
Despite all the documentation I found on the internet talking about the Option model 5000 card, I can confirm that it also applies to the model 6300. As you will be able to see in the photos I upload below, I have tried both, the 5000 and the 6300, since I have had one for quite some time but had no card to test it with, and the other is the one we have bought for the project.
VRA model 5000:
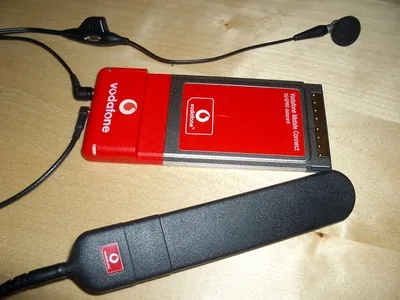
VRA model 6300:
Configuring the system
Back to the linux topic, so both cards have an internal bridge between a PCMCIA bus and a 3-port USB HUB. So then, in order for them to work you must have your PCMCIA system configured and you must make sure that the usbserial and ohci_hcd modules are loaded, as they will be the ones that load the USB HUB inside the PCMCIA and make the corresponding serial ports appear so you can access the modem. If you look at the kernel messages you will be able to see something similar to this (dmesg):
usb 5-1: new full speed USB device using ohci_hcd and address 2
usbcore: registered new driver usbserial
drivers/usb/serial/usb-serial.c: USB Serial support registered for Generic
usbcore: registered new driver usbserial_generic
drivers/usb/serial/usb-serial.c: USB Serial Driver core v2.0
drivers/usb/serial/usb-serial.c: USB Serial support registered for Option 3G data card
option 5-1:1.0: Option 3G data card converter detected
usb 5-1: Option 3G data card converter now attached to ttyUSB0
option 5-1:1.1: Option 3G data card converter detected
usb 5-1: Option 3G data card converter now attached to ttyUSB1
option 5-1:1.2: Option 3G data card converter detected
usb 5-1: Option 3G data card converter now attached to ttyUSB2
usbcore: registered new driver option
drivers/usb/serial/option.c: Option Card (PC-Card to) USB to Serial Driver: v0.4
What can confuse you is when you look at the USB devices you have connected to the system (lsmod):
# lsusb
Bus 005 Device 002: ID 0af0:5000
Bus 005 Device 001: ID 0000:0000
Bus 004 Device 001: ID 0000:0000
Bus 003 Device 001: ID 0000:0000
Bus 002 Device 003: ID 413c:8000 Dell Computer Corp.
Bus 002 Device 001: ID 0000:0000
Bus 001 Device 004: ID 0d3d:0001 Tangtop Technology Co., Ltd
Bus 001 Device 001: ID 0000:0000
You can see that on the first line, even though there is no description, there is a device connected from the vendor with the code: 0x0af0 (idVendor, that is, Option) and the device model: 0x5000 (idProduct). As you can see right now what I have connected is the model 5000 card, the 6300 simply shows this number instead of the other one.
I have done the tests with a 2.6.13.2 kernel (with udev, devfs is no longer supported in v.2.6.13). If what I want is to verify that the serial ports with which I will access the modem have been created, I can do something as simple as:
$ ls -l /dev/tts
total 0
crw-rw----  1 oriol tty   4, 64 Sep 25  2005 0
crw-rw----  1 oriol tty   4, 65 Sep 25  2005 1
crw-rw----  1 oriol tty   4, 66 Sep 25  2005 2
crw-rw----  1 oriol tty   4, 67 Sep 25  2005 3
crw-rw----  1 root  tty 188,  0 Sep 25 17:29 USB0
crw-rw----  1 root  tty 188,  1 Sep 25 17:28 USB1
crw-rw----  1 root  tty 188,  2 Sep 25 17:28 USB2
Notes about the kernel
Be careful because the card is not configured the same way for kernels >2.6 and <2.6.13 as for >2.6.12. More information in link [2] of the links section. The former only need the usbserial and ohci_hcd modules. The newer ones carry a module inside the USB Serial section of the kernel specifically for the GPRS/UMTS modems of the Option brand (CONFIG_USB_SERIAL_OPTION=m). Therefore, you have to use the two previous modules plus the specific module.
Accessing the modem with minicom to enter the PIN
The first thing we have to do is enter the PIN code of the SIM card, you will notice that when the card is configured and we have not yet entered the PIN, of the two LEDs it has one blinks green and the other red, after entering the PIN the red one should disappear.
To set the PIN for now I have not looked for any system that does it automatically. So I have done it by hand. With minicom the configuration I have used to get in is the following: (minicom -s)
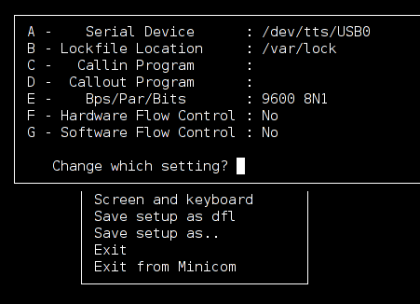
To enter the PIN we only have to go into minicom and type: AT+CPIN="1234", where 1234 is our PIN. If the PIN is correct the modem will return an OK and after about 30s the little red light will turn off.
Taking advantage of the fact that we are in minicom we can use it to launch a few more orders through the AT commands:
- AT+CSQ returns the signal level we are receiving. To have an acceptable connection in GRPS/UMTS we have to receive at least a level 12. At home I only receive between a 5 and a 9 that is why the link fails so much.
- AT&V lets us query the settings that the card comes with from the factory.
- AT_OPSYS="0,2" we only accept GPRS links
- AT_OPSYS="1,2" only UMTS.
- AT_OPSYS="2,2" preferably GPRS.
- AT_OPSYS="3,2" preferably UMTS.
Configuring the dial-up
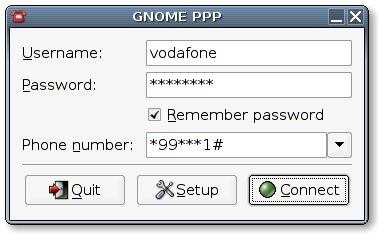
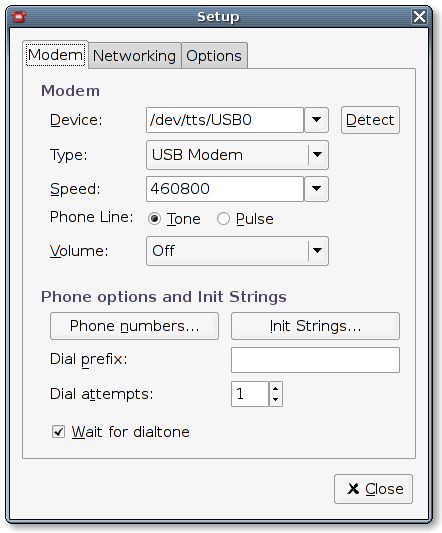
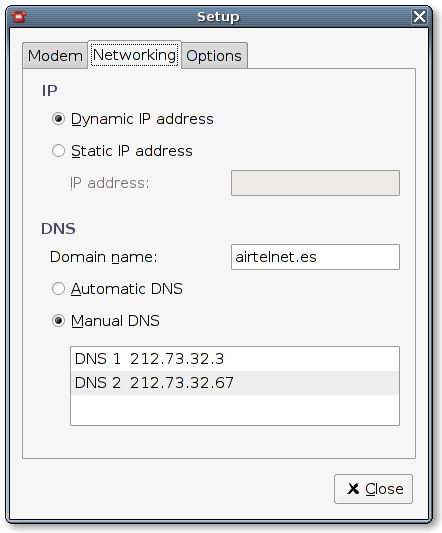
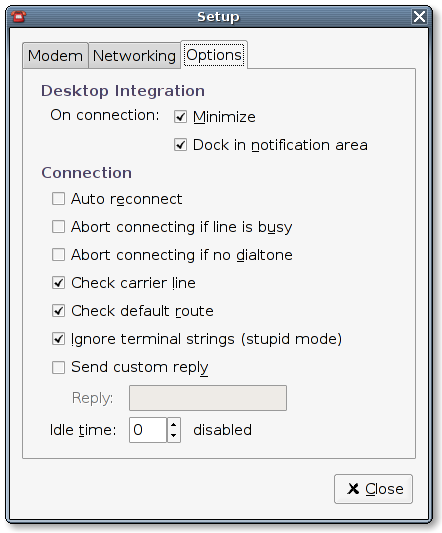
As a program to manage internet connections I have used gnome-ppp. Remember that the user who launches this application must have permissions (read+write is enough) on the modem device (in my case /dev/tts/USB0). The dia-up configuration is very simple, I put it in these captures:
Conclusion
Well then, with all this you should have enough to configure Vodafone's VRA 5000 or 6300. Do not forget that however much Vodafone it says, the company that really manufactures the cards is OPTION. To get help on the internet it can always be useful. Everything I have explained here I have taken from the links I paste below.
Links
4 comments
Comments from the old blog, as they were written. Comments are closed.
javiVF
Nomes comentar que et falta una opcio a lo de " T'ha agradat l'article?". Falta "molt" :)
—
Interessant... compte que la TP de VF te un limit d'1GB mensual, després surt a preu d'or... amb la timo crec q per un euro menys al mes et donen 1/2 Gb més.
Jo vaig estar fent proves també farà cosa d'un any quan van surtir les primeres OPTION GPRS i també amb la SonyEricsson GC79, les dos van funcionar amb linux sense problemes.
Lo del pin... és una comanda AT, no conec el gnome-ppp aquest que utilitzes, però amb el pppd configurat amb gentoo pots posar-ho a la variable INITSTRING de /etc/conf.d/net.ppp0
—
[2]
si ja sé que ho puc posar a l'initscripts aquest el problema és que com que triga uns 30s a registrar-se a la xarxa, si ho faig amb el initscripts peta la primera connexió hauria de trobar algún sleep o algo així. També havia pensat fer un script de sistema tipus post-pcmcia-insert i que es llencés amb aquell moment, em pilles? però la veritat és que no ho he mirat més.
Carita
aimable pupille ^@^ ado cul dans la residence ^@^ sekretar prostituerad i sovrummet ^@^ tjejer urinerar i sovrummet ^@^ pidettava beibit pano ^@^ viilea tytsyt suihinotto ^@^ fille pute dans la chambre ^@^ poilu videos ^@^ skolepike whack pa rommet ^@^ tenaring dildo i sengen ^@^ lol grietje ^@^ interraciaal gallerien ^@^ kuumempi tarve naimaton ^@^ kuuma himo hoikka ^@^ mama sale ^@^ la plus chaude mman video ^@^ bello segretaria urinate ^@^ pornostars mepeg ^@^ gemiddeld glimlachend ^@^ geile moeder tekenfilms ^@^